Tuesday, July 26, 2011

Healthy Eating: Fish and Tofu in Black Bean Sauce


I must admit that my husband cooks WAY BETTER than me. He is Kapampangan which explains why he's good at the tantya method of cooking. He cooks by taste not by measurement.

I, on the other hand, knows how to do any household chore except to cook. This explains why I google recipes, watch cooking shows and youtube videos and read food blogs. This also explains why I started baking first before cooking. With baking, everything needs to be exact - you need to follow the recipe down to the last details. Which I like. Because I don't know how to estimate ingredients. You have a fixed measurement of all the ingredients so ideally you can never go wrong.

It's actually my husband who saw this recipe in the Quickfire TV show. He did not took notes, he just remembered all the ingredients and again, he just estimated everything while he cooked.

My turn to try this recipe. I wasn't able to watch the episode of Quickfire so I googled the recipe. Lucky me! Quickfire has a Facebook page with most of the recipes from the show! Yey!

Fish and Tofu in Black Bean Sauce
Recipe from Quickfire Facebook Fan Page

  • 1 sili labuyo, chopped (I did not use this because I don't want this to be spicy for my kids)
  • 1- 7 Grams AJI GINISA SHRIMP (I didn't have this so I used Maggi Magic Sarap)
  • 1 thumb sized ginger, minced
  • 1 tablespoon black bean sauce
  • 2 tbsp soy sauce
  • 1 tbsp vegetable oil
  • 1 tbsp white sugar
  • 1 tbsp slurry (This is just cornstarch dissolved in water)
  • 1 tsp sesame oil
  • 300g cream dory (Cut into squares)
  • 1 pack firm tofu, drained and cubed
  • ½ spring onion, sliced (I didn't have this)
Heat up your pan or your wok and add vegetable oil. I used canola oil.

Fry ginger, garlic and labuyo (if using) until aromatic.

Add the fish squares and stir fry for a 2 minutes. Add the tofu cubes and season with Aji Shrimp or Maggi Magic Sarap.


Add the black bean sauce, soy sauce, sugar, sesame oil and stir fry until the fish is cooked, about 5 minutes. Season with a dash of pepper.

Add slurry slowly, checking to see that the sauce does not dry up. If it does, add a little water.

Toss chopped spring onion, if using.

Serve hot.

Pawis rating: 2 of 5 very easy!
Monday, July 25, 2011

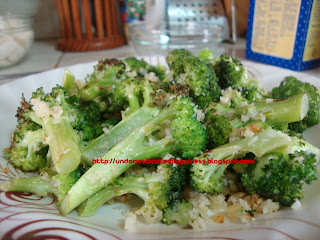
Healthy Eating: Very Easy Parmesan Broccoli

I first saw this in Can You Stay for Dinner? and then at the Food Network website. The recipe was so easy and looks delish!

So why not try?

Parmesan Broccoli from the Food Network

  • Broccoli florets
  • Minced garlic
  • Extra virgin olive oil
  • Grated parmesan
  • Japanese breadcrumbs
Preheat oven to 450F. Blanch the broccoli florets

Drain the hot water and place in a bowl. Add the minced garlic, a few drops of extra virgin olive oil, a few tablespoons of grated parmesan and Japanese breadcrumbs.

Place in a cookie sheet. Bake in the oven for 15 minutes.

Transfer to a plate and serve.

Pawis rating: 1 of 5 super easy!

Cake Balls


Melting chocolates was never my favorite task in the kitchen. I hate it! Chocolates are so sensitive. You have to melt them slowly so they don't burn, then you have to use them quickly so they don't harden.

This very reason was behind my frustration when I first tried making cake balls/cake pops. Bakerella made it look so easy. I was fooled. I learned that in making these deserts, you have to be very quick.

But I was not one to be easily discouraged. I'm stubborn so I tried again.

Cake Balls
from Bakerella.com

Bake your cake. This could be chocolate, vanilla, whatever you like. You can use a cake box mix if you like. I used the Martha Stewart recipe I used here.

The best part is crumbling the cake.

Make frosting. I used the basic buttercream recipe I used here.

Combine the crumbled cake and frosting. Make sure the frosting is well incorporated but not too wet.

Shape into balls. I used a measuring spoon and shaped the ball using my hands.

Place your cake balls in a cookie sheet lined with wax paper.

Continue shaping the balls until you fill your cookie sheet. Place the balls in the fridge for 2-4 hours or in the freezer for 30 minutes.

Get your chocolate and decorations.


Melt your chocolate in the microwave for 1 minute or on top of the stove. Sorry, no pictures (as I said, I find this stage very stressful so I had to work quickly). Get a cake ball, cover the ball with the melted chocolate and cover in sprinkles. Place in mini-muffin cups and keep in the fridge for a few hours so the chocolate will set.

I know, I know...I wished for a neat cake ball similar to what you see all over the net. I need to practice some more!

Pawis rating: 4 of 5 hard!

Friday, July 15, 2011

Homemade Pizza

The craving started after watching "Ever Wondered About Food". A whole episode on pizza. Pizza, Domino's, Papa John's.

The best part for me was when they showed how a genuine Napoletana pizza - nothing but ingredients native and exclusively sourced in France. Strict rules on how strict the pizza dough should be. They have an entire organization devoted to making sure the tradition is kept alive. Wow.

I was not a pizza-lover - well, until I got a taste of New York pizza. I never tried NY pizza in my previous travels. To me, they were all the same. Pizza in the Philippines is the same as pizza anywhere else. I was dead wrong.

In a trip back in 2009, my colleagues from the office wanted to try the local pizza in a NY pizzeria. Off we went to this small restaurant where they gave us a huge, I think 24", pizza placed on top of a beer pail. Oh.My.God. The pizza was amazing! Did I just say I'm not a pizza lover? Well, consider me a convert!

I was able to finish 2 gigantic slices of this awesome pizza! By the way, I had to fold the pizza slice to make sure it fits in my mouth. And no, you can't eat pizza with fork and knife in NY. I don't think you should even do that in Manila, just weird.

So, back to the day I craved pizza this week. I decided to make my own, at home. Pizza with homemade dough.

Pizza dough recipe from Yummy Magazine January/February 2011 issue

  • 2 tsps active dry yeast - I used scant 2 tsps instant active dry yeast
  • 3/4 cup lukewarm water
  • 1 3/4 cups all-purpose flour
  • 2 tbsps oil
  • 1/4 tsp salt

Combine all-purpose flour, salt and yeast in a bowl. If you're not using instant yeast, you need to put the yeast first in the lukewarm water and let it proof for about 5-10 minutes.

Add the water, oil and salt.

Mix until well combined.

Transfer to a floured work surface and knead for 5 minutes.

Leave, covered with a kitchen towel, for about 20 minutes (the recipe actually says 10 minutes).

Dough should look like this. Don't forget the towel!
Punch the dough and knead for another 5 minutes.

Flatten the dough using a rolling pin.

Transfer to a pizza pan.

Make your own pizza sauce

I would have loved to make the sauce from scratch (boiled and peeled tomatoes cut into chunks, olive oil, oregano, onion) but I didn't have enough tomatoes at home. So I made one from a tomato sauce pouch.

Add dried oregano and/or basil.

Spread on top of the pizza dough and add all the toppings you want. I used sliced leftover salami (from my sandwich baon stash), olives, green bell pepper, mushrooms and cheese.


Bake in a preheated oven at 375F for 10 minutes. The recipe instructions are for 5 minutes but my oven is cranky and needs extra time. As soon as the cheese has melted and the pizza dough is slightly brown, your pizza is done.


Slice and enjoy!

Pawis rating: 2 of 5 - very easy!

Brazo de Mercedes


I've been in Pinoy cooking mode recently. I tried making Pinoy style chicken curry (which I wasn't able to take pictures of) last week and it wasn't bad. I have never been one to be successful in cooking. Again, I got the recipe from Panlasang Pinoy which is just so addicting! I enjoy watching the videos of how each dish is cooked :-)

A treasure trove of Filipino recipes! I watched the video of how to make Brazo de Mercedes - one of my favorite, favorite deserts/cakes of all time - and I was shocked at how simple it was to make! Simple steps, few ingredients that are all readily available in the local market.

Time to try this out!

Brazo de Mercedes Recipe from Panlasang Pinoy

  • 10 large raw eggs, yolks and whites separated
  • 1/2 teaspoon cream of tartar
  • 1 teaspoon vanilla extract
  • 3/4 cup granulated sugar
  • 3 tablespoons confectioners sugar
  • 14 ounces condensed milk (this is 1 3/4 cups)

Separate eggs. I don't have any fancy device to do this. I just use my hands.

Preheat oven to 350F. Add cream of tartar to egg whites and beat till soft peaks form.


This is soft peak.

Add granulated sugar. I ran out of white sugar so I used washed sugar.


Continue beating until stiff peaks form. I had to transfer the egg white mixture to a bigger bowl because the mixture was overflowing.


Place wax paper on a baking sheet. Spread the egg white mixture on top of the wax paper. Your offset spatula will be a great help to flatten the egg white mixture.

Make stripes using a fork.

Bake the meringue in the preheated oven for 20-22 minutes or until the top turns slightly brown.

While the meringue is baking, make the filling. On low to medium heat, combine egg yolks and condensed milk. Stir continuously until the mixture becomes thick in a spreadable consistency. Turn off the heat and add the vanilla extract. Set aside.


Get the meringue from the oven. Sprinkle confectioner's sugar on top. Sorry, no picture of the meringue with sugar.

Place wax paper on top of another baking sheet with the same size. Put the baking sheet on top of the meringue and flip the meringue over. Remove the wax paper. The opposite side of the meringue should now be on top. The opposite side was a little burnt :-(

Spread the filling on top of the meringue.

Roll the meringue. Of course, the filling should be inside :-)

This was a huge brazo de mercedes!

Slice and enjoy!


Pawis rating: 2 of 5 very easy!