Thursday, March 24, 2011

Paella Fried Rice

Most people I know, at least most moms, would have a signature Filipino dish. I don't have one. I don't even know how to cook a basic adobo. Boohoo!

So...I made up my mind I would master paella. Naks! First step - get a very simple paella-ish dish. This one from Yummy is very easy to make.

Paella Fried Rice by Chef Jun Jun De Guzman

1 1/2 tablespoons finely chopped garlic
1/4 cup extra virgin olive oil
3/4 cup sliced onions
1 teaspoon paprika Bilbao (Spanish paprika or smoked paprika)
1 piece chorizo Pamplona, sliced
4 cups cooked rice
1 medium bundle asparagus, trimmed and blanched
1/2 medium head cauliflower, trimmed and blanched
1 medium head broccoli, trimmed and blanched
1 red bell pepper, roasted and sliced

  1. Sauté garlic in olive oil. Add sliced onions and cook until translucent.
  2. Mix in paprika Bilbao and cook until aromatic. Add sliced chorizo and continue cooking until fat is rendered.
  3. Mix in cooked rice and toss well until coated with paprika mixture.
  4. Add vegetables and mix well. Serve while hot.

Seasoning tip: Adding precooked chicken, pork, or seafood (shrimps, crab, fish fillet chunks) will make this simple side dish a meal all on its own.

Sorry, no pics :-( My camera's battery died just when everything was ready.

I was coming home from work one morning when I decided to cook this. I called up the house while driving and asked for the helper to buy brocolli, red bell pepper and chorizo.

I made a mistake here because I asked our helper to buy chorizo de Bilbao instead of chorizo de Pamplona. It was an expensive mistake! The bilbao costs almost 100 pesos! I don't know how much pamplona is and I'm not sure if we have it here.

Next time I make this though I would season with salt because the paprika is a little matabang for me. I also added chicken so this could be a complete meal. I didn't use cauliflower (because I don't like that vegetable at all) and asparagus (because no one sells that in our local market).

I shall try this again! This is a good, satisfying meal. Who knows maybe in the next months I will be able to make an authentic paella valenciana!

Pawis rating: 2 of 5 - very easy!

Wednesday, March 23, 2011

Exams Week


A few pages of my daughter's Math Reviewer
One of a number of hell weeks a working mom dreads would be exams week. Not of the working mom, but of the kids!

It's my daughter's exams week this week. She's in first grade and still needs some supervision when studying. You know how kids' attention gets when you leave them alone to do something.

Aside from making sure she reads and understands what she reads, we do question and answer and worst, in some subjects, like say Math, I need to make reviewers!

I also had to pick her up from school because her school bus/van don't have services this week. I do this after work...well, 4 hours after work. Then we go home and study. I feel my eyelids drooping and I'm starting not to make sense. Aaargh!!!

Martha Stewart's Vanilla Cake with Simple Buttercream Frosting

I've never tried baking a vanilla cake. I've made several versions of chocolate cakes and I'm getting tired of it.

The YouTube video of Martha Stewart demo-ing her versatile vanilla cake seduced me into making one!

Aside from this being my first vanilla cake, this is also my first time at trying to make a layer cake. Such a daunting task! If only I had another 9" baking pan LOL!

So off I went to the Baker's Hub to get me another 9" baking pan. I got my first 9" pan from SM which was springform. The one I got from Baker's Hub was not - not because they don't have it available but because I have limited budget hehehe.

I just followed the recipe. You can't go wrong because it's pretty simple.

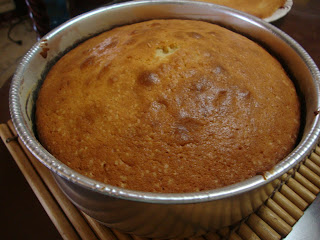
Cake just out of the oven in my new 9" pan which I found easier to use than the springform

Now, leveling and layering the cake was easy. Thanks to my new purchase :-)


Wilton Cake Leveler (around 250PHP at Baker's Hub)

The Wilton Cake Leveler was so easy to use. I'm surprised at how easy it is actually. My cakes were leveled with no awkward knife marks that a serrated knife would make. The big advantage is that the cake is really flat.

See? Easy!

The frosting though was a different thing! I couldn't get those egg white/sugar mixture to peak!!! Damn you, cheap mixer! So, I used the tried-and-tested buttercream recipe. Buttercream is overpowering because it's too sweet but the kids love it. I guess I'm just getting old.


Wilton Cake Turntable Plus (around 750 PHP at Gourdo's)

This turntable has turned my frosting life around LOL! I used to get so frustrated when I frost my cakes. With this turntable, I was able to frost without perspiring heavily hahaha! Plus, this is very affordable compared to the big ones which are priced at 2,000PHP++! For a beginner, this is a good tool for frosting!

Make sure that when you frost, you follow Mother Martha's advise to put parchment paper strips forming a square on your cake board so you won't have to clean up icing mess after frosting :-)

Tada! This is for my son's "graduation" from playschool :-)

Final product still needs improvement. Notice that the layers are not equal, duh! I blame this on my pans which are not the same. Mental note: Next time, use similar pans :-)


PS - If you're wondering how I made the cake greeting, I owe it to this little wonder! Edible sparkle gel :-) Warning: Don't use on the sides as this easily slides off the frosting.

Pawis rating: 5 of 5 = complicated!

Wednesday, March 16, 2011

Cheddar Cheese Muffins

They say that the secret to good muffins is in the mixing. Never, ever overmix the muffin batter or they'll turn out hard. I made this mistake so many times in the past that my muffins are very stiff outside but moist inside. What we're aiming for is the crumbly kind.

A very easy muffin recipe is in Yummy's So-Easy Sweets mini-book: Cheddar Cheese muffins. Aside from being easy, the ingredients are cheap and you could find in your pantry any day.

Cheddar Cheese Muffins by Yummy

3 tbsps melted butter
1 egg
1 cup milk
2 cups all-purpose flour
1/4 cup sugar
1/2 teaspoon salt
1 tbsp baking powder
1/2 cup diced Cheddar Cheese

  1. Preheat oven to 400F. Line a 12 hole muffin pan with paper cups.
  2. In a bowl, combine the melted butter, egg, and milk. Set aside.
  3. In another bowl, blend together flour, sugar, salt and baking powder. Add cheese.
  4. Ad flour mixture to the liquid mixture and stir just until blended. Do not overmix.
  5. Pour into the prepared pan and bake until done, 20 to 30 minutes.
I suggest fixing the tops to make sure they're smooth so the muffins would have a smooth dome top when done.

This is how messy it would look if you don't smooth the top before baking

Placed in cooling rack

Up close

I don't know if I made these right. The muffin picture in the book in no way resembles mine. I think I did something wrong again. I should try this one more time or try another muffin recipe.

Pawis rating: 2 of 5 - very easy.

Tuna Pasta for Dummies

When you're hungry and you don't have either: (1) time, (2) energy, or (3) kitchen skills, then tuna pasta is the dish for you!

Very easy! Cook pasta (spaghetti, macaroni, penne, whatever except lasagna) according to package directions. In a pan, saute chopped garlic (if you're too lazy, you can skip this), canned tuna (2 small cans or 1 big can), tomato sauce (small Del Monte pack) plus dash of salt, chili powder, basil leaves. Let simmer. You can add black olives if you have these available. While sauce is hot, mix with pasta. See, not bad right?

Pawis rating: 1 of 5 = chicken

Tuesday, March 15, 2011

I want to make this vanilla/lemon cake

I was trying to view the Yellow butter cake video in Martha Stewart's website but the darn video just won't stream continuously. It was like listening to a conference call where everyone was choppy except here the video and the audio is choppy. I couldn't understand a thing!

I tried searching for that video in Youtube but I was unsuccessful. I saw this instead: Martha Stewart's Vanilla Cake video! I was excited to try especially the lemon version but I was too lazy to jot down the ingredients and the instructions.

It's a little comforting too that there are other people who are worst at frosting than I am! Haha!

Sunday, March 13, 2011

Banana Chocolate Chip Cake

I don't think this is actually a cake. I think it's more of a muffin or a bread. I find the texture of this a little rough for a cake.

With that said, I don't bake it in cake pans. I use muffin pans or mini-loaf pans. I think mini-loaf pans are the best - you get to bake bread recipes in small sizes which are great for packed lunch or snack :-)

1 1/2 cup all-purpose flour
2/3 cup white sugar
1 1/2 tsp baking powder
1/4 tsp salt
1 cup mashed bananas
1 egg
1/2 cup unsalted butter, melted
1/4 cup milk
3/4 cup chocolate chips

  1. Preheat oven to 350F. Grease and flour a 9X13 pan.
  2. In a large bowl, mix flour, sugar, baking powder, and salt.
  3. In a separate bowl, combine bananas, egg, melted butter and milk.
  4. Stir in banana mixture into flour mixture until blended. Be careful not to overmix.
  5. Stir in chocolate chips.
  6. Pour batter into pan. Bake for 30-35 mins or until toothpick inserted into center of cake comes out clean.

I was able to make 7 mini-loaves out of this recipe.
Close up! Gooey and sticky!!!

Just before they were done, I pulled them out of the oven then placed walnuts on top.

Finished! :-)

Pawis rating: 2 of 5 = easy!

Caramel Fudge Brownies without the Caramel

For the record, I have tried to make brownies twice and failed. In both cases, I have the bottom part totally burnt into a black, solid base and the top part wet which means it's still hilaw.

So, I figured maybe three's the charm! Yeah right, I was actually thinking, I'm sure I'll mess this up again.

I got this recipe from Yummy's recipe book So-Easy Swe
ets. I think there were 3 brownie recipes in there but I chose this one because I had all the ingredients at home.

Caramel Fudge Brownies

For the caramel fudge (which I did not do because I don't have co
rn syrup)
1 1/2 cups sugar
1/2 cup whipping cream
2 tbsps butter
1 tbsp corn syrup
dash of salt

For the brownie
1/2 cup chopped unsweetened chocolate
1/2 cup butter
1 1/2 cups sugar
2 eggs
1 tsp vanilla extract
2/3 cup all purpose flour
1/2 cup coarsely chopped walnuts
1/2 cup semisweet chocolate chunks or chips

  1. In a saucepan, melt sugar until lightly browned. Gradually add cream, then butter and corn syrup. The mixture will form bubbles - just keep stirring until the caramel is smooth and the sugar is completely melted. Simmer for about 30 minutes or until caramel is thick. Remove from heat. The caramel will thicken as it cools.
  2. Preheat oven to 350F. Line an 8-inch square pan with aluminum foil then grease the foil. Set aside.
  3. In the microwave or in a small pan, heat chocolate and butter together until melted. Remove from heat.
  4. Stir in sugar and mix well. Add eggs, one at a time, beating well after each addition. Stir in vanilla.
  5. Add flour and mix until well blended.
  6. Pour mixture into the prepared pan and bake for 20 to 25 minutes or until done.
  7. Spread caramel fudge over baked brownies. Top with nuts and chocolate chunks. Cool.
I tweaked this recipe a bit because I don't like caramel and I don't have corn syrup at home. I followed the instructions for making the brownie, added 2 tbsps of the walnut-chocolate chip combo into the mix and popped into the oven. When the brownie's almost done (top looked cooked but when you insert a toothpick, the middle part is still not done), I took out the pan and sprinkled the rest of the walnut-chocolate chip chunks to cover the whole thing. Then I put the pan back into the oven and waited till it's done.

So, why did I mess up the first 2 times I made brownie? Two things: (1) I
did not cover the pan with aluminum foil because my pan is non-stick, and (2) I placed the pan in the lower portion of the oven where it's very hot. This time around I followed the instructions carefully and remembered the tip I see in some recipes I read in the internet (always put the pan in the middle or top part of the oven). Voila! Brownie success!!!

Took the pan out of the oven and sprinkled chocolate chips and nuts on top. Look at the lovely aluminum foil dressup :-)

Pawis rating
: 2 of 5 - easy!

Friday, March 11, 2011

Vanilla Cupcake with Chocolate Buttercream Frosting

I've been itching to bake something last weekend. But I don't want to make something I've tried and tested before.

I love chocolate cupcakes. It's always chocolate when I go to Sonja's or even when I get a bag of local, readymade cupcakes. I've never tried making vanilla cupcakes before so off I went to Joy the Baker to see if she's made one.

Joy did not disappoint. Her recipe index boasts of classic cakes and cupcake recipes with a twist. So when I saw vanilla cupcakes with chocolate buttercream - wow! I just have to try this.

Reviewing the recipe though, I was daunted by the idea of using actual vanilla beans. Hello! First, I'm not some culinary studies-educated-type of person that I can easily scrape out seeds off of vanilla beans. And most importantly, where can I get a vanilla bean in my side of the world??? I don't just live in a tropical country where vanilla beans are not native, but I also live in a province in a tropical country where the closest thing you can get to vanilla is vanilla extract.

So off I go to my mother, Martha Stewart. I found a classic vanilla cupcake recipe good for 3 dozens. Wait-a-minute, THREE DOZENS??? Who in her right mind would make 3 dozens of vanilla cupcakes just out on a whim??? Besides, if I do this and stock these in the ref, my kids would probably be on sugar overload for an entire week and that we know, will drive any normal, child-loving parent crazy!

I decided to half the vanilla cupcake recipe for the chocolate buttercream frosting recipe. I was able to make 2 dozens cupcakes.

The vanilla cupcake was easy-peasy. Just remember to always, always check your cupcakes every 5-10 mins so you're sure they don't get burnt. Never leave your goodies alone in the oven. Always check if the temperature is right. And oh, place the rack on the middle part of the oven. This way the cupcake will cook thoroughly (not burnt at the bottom and uncooked at the top, which happened to me so many times in the past...ewww!).

The buttercream is a different story though. I decided to use confectioners sugar because I thought "it's frosting and confectioners sugar would make this so smooth and velvety". Big mistake! The buttercream won't stiffen. It's like buttercream without any will to live...like sick buttercream. Taste is okay though. I think if I've used regular white sugar, the buttercream might have been more "stiff".

With that, piping is nearly impossible. I did try but I definitely failed!


This was my failed attempt to pipe buttercream. Such a loser.


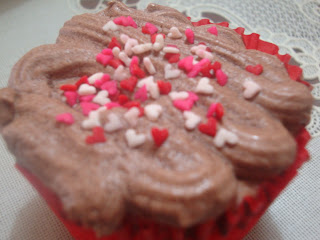
This was after I got frustrated with the piping and just decided to spread the thing into the cupcakes. I think this is more decent. Better to just spread it than make a whole mess of trying to pipe the buttercream.


This was how it looked like after a few bites.

Pawis Rating:
  • Vanilla cupcake - 3 of 5 only because you have to check them every once in a while in the oven.
  • Buttercream - 5 of 5 because I didn't follow the recipe correctly. Darn!
Judge's comments:
  • Mama and our senior citizen yayas - "Masama sa blood sugar...hati na lang tayo."

Saturday, March 5, 2011

Today

Today, I will -
- bake all the cupcakes I can
- whip heavy cream till my arms bulge
- and cook till I smell like burnt garlic

Yes, I will do all that today.

All because my eyes are tired at staring at my laptop all day long and not getting enough rest in the 6 hours I'm at home. I actually don't see the logic, but who needs to? teehee!