Tuesday, April 26, 2011

Go Local! Make Tablea Brownies

Do you get local pasalubong every time a friend or a relative comes home from vacation? I get lots! And I hate that sometimes they go to waste (how many bottles of pili nuts can you eat???). Oh, and I hate that they went on vacation and I stayed home!

I had a bag of tablea tsokolate from Laguna and didn't know what to make of them till I was browsing my old magazines and saw a recipe in Yummy magazine (Nov 2010) for tablea brownies. Problem solved!

Here is the recipe:

In a pan, melt together 1 cup butter and 1 cup chopped tablea tsokolate; cool. In a bowl, whisk together 2 cups sugar, 2 cups flour, and 1 teaspoon salt. Beat 7 large eggs in butter-tablea mixture. Fold in dry ingredients; do not overmix. Transfer to 2 prepared 8X8 inch pans (I used one 9X13 because I don't have 8X8s) and sprinkle with 1/4 cup chopped nuts (I used walnuts) over each pan. Bake in a preheated 350F oven for 30-35 minutes.

The result was a simple, not-too-sweet brownie. Just right! Be warned though that this is not the fudgy, sticky type of brownie. This one is very light and a little dry.

I think I could use these tableas in some of my cake/cupcake recipes some time. They make great chocolate milkshakes too! :-)

Just out of the oven
Closer

Nice :-)
Pawis rating: 2 of 5 very easy!

Best-Mom-in-the-World Banana Bread

Smells heavenly!

I made banana chocolate chip cake before and it was really easy. It was a cake recipe that I forced to become bread mini-loaves. This time, I want to make the real thing.

If you have read my Focaccia bread misadventure, you would know how much I hate using yeast. I gave yeast another try last week on a pizza recipe, and again failed. I am officially declaring that yeast will never be my friend.

I am extremely relieved that this recipe does not call for yeast! Yey!!!

This recipe is from tidymom.net and she guaranteed it will earn you Best Mom in the World award. Even if my daughter did not say it and my sons cannot say it yet, I know that I'm the best mom with this bread! Winner!
  • 1 1/4 cup sugar
  • 1 stick (1/2 cup) butter
  • 2 eggs
  • 1/2 cup milk
  • 3-4 mashed bananas
  • 1 tsp vanilla
  • 2 1/2 cups flour
  • 1 tsp salt
  • 1 tsp baking soda
  • 1 1/2 tsp cinnamon
  • 1/4 - 1/2 cup mini chocolate chips
  • walnuts if desired - I used 1/2 cup of chopped walnuts

  1. Preheat oven to 350 degrees
  2. Cream together sugar and butter, add eggs one at a time. Mix in milk, bananas and vanilla.
  3. Stir in dry ingredients. (The important thing is you do not want to over mix the batter. You don't want it smooth. Over mixing the batter will give you tough, rubbery bread.)
  4. Pour into greased loaf pan.
  5. Bake until bread is golden brown and a toothpick inserted in the center comes out clean, about 60 mins for regular loaf pan, or 30 mins for mini loaves.
I used a mini-loaf pan

The result is the kind of banana bread I love - moist on the outside and yummy on the inside. I highly recommend you use walnuts because it adds that extra flavor and crunch.

Fresh from the oven


Slice if you're in a diet-dietan mode :-)

Pawis rating: 1 of 5 super easy!

Monday, April 25, 2011

Mango Layer Cake

Make someone happy!

I live in a house with a huge backyard. We have a mini-forest in our yard - yes, lots of trees. I'm not the type though that likes to walk around the yard or to sleep on a hammock. I like my afternoon naps in an air-conditioned room where I'm bundled up in sheets.

Because we have a big backyard, through the years we've somehow let at least 5 mango trees grow. I think we have the 3 standard mango types there - the kinalabaw, the piko and the indian mango (don't ask me, I don't know why Philippine mangoes are named this way).

We also have a vacant lot in a barangay not too far from our house where we have at least 10 mango trees. My father loves mangoes. Obvious?

During summer, we have an abundance (read - huge tubs and pails of mangoes) at home. What to do with tons of mangoes? With all these mangoes around me, I can't help but think of substituting strawberries on the Strawberry Layer Cake recipe in Yummy's January/February 2011 issue.

Mango Layer Cake (replaced strawberries from Aileen Anastacio's Strawberry Layer Cake recipe in Yummy magazine)

For the vanilla chiffon cake
  • 1 cup cake flour
  • 1/3 cup sugar
  • 1 tsp baking powder
  • 1/4 tsp salt
  • 1/3 cup corn oil - We don't have corn oil so I used canola.
  • 4 eggs, separated
  • 1/3 cup water
  • 1/4 cup low-fat milk
  • 1 tsp vanilla extract
  • 1/4 tsp cream of tartar
  • 1/4 cup sugar

For the mango mousse
  • 8 ounces fresh ripe mangoes, skin removed - Best to use the kinalabaw type
  • 2/3 cup sugar
  • 3 tbsps water
  • 2 tbsps Charmbord, Cointreau, or framboise (optional) - Optional means no need to use :-)
  • 1 1/2 tsps powdered gelati
  • 1 1/2 cups heavy cream

For the topping
  • 1/2 cup heavy cream
  • 2 tbsps confectioners' sugar
  • Fresh ripe mango shaped into small balls
  1. Preheat oven to 350F. Line a 9-inch round or 8X12 inch rectangular baking pan; set aside.
  2. Make the vanilla chiffon cake: In a medium bowl, sift together cake flour, sugar, baking powder and salt.
  3. In a separate bowl, whisk together corn oil, egg yolks, water, milk, and vanilla extract. Add to the cake flour mixture, mixing until combined and smooth.
  4. In the bowl of an electric mixer fitted with the whisk attachment, whip egg whites and cream of tartar on medium speed until frothy. Increase speed to medium-high and gradually add sugar, whipping until glossy and stiff.
  5. Gradually fold the whipped egg whites into the batter; blend well.
  6. Transfer batter into the prepared pan and bake for 30 minutes or until top springs back when touched. Do not prick.
  7. Remove from the oven and allow to cool completely.
  8. Make the mango mousse: Puree mangoes. Stir in sugar until dissolved.
  9. In a separate bowl, combine the water and liqueur, if using. Sprinkle gelatin over and allow to bloom, about 5 minutes. Melt gelatin mixture over low heat until completely dissolved.
  10. Gradually whisk gelatin into fruit puree. You can stir the mixture over an ice bath until it starts to thicken.
  11. In the bowl of an electric mixer fitted with the whisk attachment, whip cream and fold into the fruit puree. Mix until combined and smooth.
  12. Line a 9-inch cake ring with an acetate strip. Place ring over a cake plate or stand. - I don't have a cake ring so I used my 9-inch springform pan.
  13. Slice cooled chiffon cake horizontally into 1/4 inch thick layers. Place 1 layer into the cake ring. - You can easily do this with a cake leveler.
  14. Pour about 2 to 2 1/2 cups of mango mousse over the first layer. Using a metal spatula, spread and even out the mousse layer.
  15. Top the mouse gently with another chiffon cake layer. Place in the freezer for at least 2 hours or until set. Unmold the cake from the cake ring.
  16. Decorate the cake: In the bowl of an electric mixer fitted with the whisk attachment, whip heavy cream to soft peaks then gradually add confectioners' sugar. Spread about 1/4 to 1/2 cup of the whipped cream over the chiffon cake. Top with fresh ripe mangoes.

This must be how heaven feels and smells like - soft, fluffy, sweet.

Take the cake out of the freezer and unmold from the cake ring or, in my cake ring-less case, the springform pan.
Take a nice, big slice
Consume immediately

Pawis rating: 3 of 5 just okay

Sunday, April 24, 2011

Lasagna with Bechamel Sauce

Me: Marion, I will cook lasagna today.
Marion: Mommy, pagkain ng pusa yan (Mommy, that's cat food)
Me: Ano?! (What?!)
Marion: That's what Garfield eats!

Does this look like cat food? I'm sure cats would eat this cheesy, meaty goodness but this sure is safe for humans too.

I actually forgot where I got this recipe from (if you know, please message me and I'll acknowledge the chef/cook).

Edit: I found the chef!!! This recipe is from Pinoy Food Blog! Thank you Ms. Noemi Lardazabal-Dado for making this on Mother's Day! (And thank you to Facebook for the regular updates hihihi)

Lasagna with Bechamel Sauce

Bechamel Sauce
  • 3/4 cup butter
  • 1/4 cup flour
  • 2 cans evaporated milk (1 can is equivalent to 225 ml or 1 cup)
  • 1 tsp salt
  • 1/4 tsp pepper
  • 1/4 tsp nutmeg

  1. Melt butter in a pan.
  2. Blend in flour until bubbly.
  3. Gradually stir in evaporated milk.
  4. Cook until bubbly and a bit thick. Make sure not to burn the milk by lowering the flame.
  5. Season with salt, pepper and nutmeg.
  6. Set aside
Cooking the bechamel sauce. This should come out thick and bubbly.

Tomato Meat Sauce
  • 3/4 kilo ground beef
  • 1/4 cup olive oil
  • 1/2 cup butter
  • 4 cloves garlic, crushed
  • 6 tbsp white wine (optional) - I did not use this as I obviously skip every optional ingredient in every recipe (that's just me being lazy)
  • 1/4 tsp nutmeg
  • 1/3 tsp oregano
  • 1 tsp salt
  • 4 tbsp basil leaves, shredded - I used dried basil
  • 1/2 tsp pepper
  • 1 cup beef broth
  • 2 cans tomato paste (150 grams each)
  • shredded mozzarella cheese to add in between layers and for topping - I did not use this, you can see my explanation below.

  1. Heat olive oil and butter.
  2. Brown the garlic, add the onions and cook until soft.
  3. Put in the ground beef, wine and spices.
  4. Allow to cook for a while then pour in the beef broth and tomato paste.
  5. Simmer gently until thick. A little flour may be needed to thicken the sauce. - I didn't need the flour as the sauce was already thick.
  6. Set aside.

Very tasty meat sauce

Lasagna cooked according to package directions

I was scared to cook lasagna pasta for fear of breaking the pasta. It's so easy pala! And you only need 4 minutes :-) Don't overcook or you'll have soggy pasta when you take the lasagna off the oven.

Assemble the lasagna
  1. Grease a rectangular dish (around 10X17 inches) with butter.
  2. Pour 1/3 of bechamel sauce.
  3. Arrange a layer of pasta. Spoon in tomato meat sauce and sprinkle with cheese.
  4. Repeat number 3. End with bechamel sauce on the top layer.
  5. Sprinkle with mozzarella cheese.
  6. Bake 350F until golden brown.
  7. Let stand 5 to 10 minutes to set before serving.

To explain myself - I did not use mozzarella cheese because we don't have it available anywhere near my house. I would give a reward to anyone who can find mozzarella cheese near our town. So I used quickmelt cheese instead (I know, so cheap). Plus cream cheese (not so cheap). I still got the cheesy gooeyness I wanted.

Next time, I would use a bigger (or deeper dish) so I can use the entire box of lasagna pasta. And I will double the meat sauce recipe. I find the meat sauce not enough for a 4 layer lasagna. I had to be careful in proportioning the potful of meat sauce so I have enough to put on top.

Serve this during family reunions, parties or dinner with friends and you'll be instant bida! Guaranteed bestseller! Best served with crusty bread :-)

Pawis rating: 1 of 5 super easy, no need to use your brains :-)

Red Velvet Cake with Cream Cheese Frosting

I decided to have my monthly supermarket trip to be at Landmark Trinoma last week. I do my grocery shopping monthly to buy in bulk and save on gas (parking, merienda, etc). I usually do this monthly ritual in Robinson's Bulacan where it's closer to home. This month though, since I have time to spare after my monthly salon visit, I decided to go to Landmark instead.

Did I make the right decision? Well, if finding different liquid food coloring is an indicator, then it's a big YES! Landmark also carries several cake decorating supplies (sprinkles, chocolate chips) at very affordable prices. And they have a good selection of healthy stuff that I hoarded (spinach pasta, whole wheat spaghetti, whole peeled tomatoes, diced tomatoes, all kinds of canned tomatoes).

I have always wanted to make Bakerella's Red Velvet Cake but discouraged because I do not know where to get liquid food coloring. The only ones I have and I know are the icing coloring pastes from Wilton and Americolor. I must've been really lucky last week to find McCormick's liquid food coloring - in red, violet, blue and green. Yes, I bought one of each color :-)

Here is the recipe:

Red Velvet Cake from Bakerella.com

  • 2 1/2 cups all purpose flour
  • 2 cups sugar
  • 1 Tablespoon cocoa
  • 1 teaspoon salt
  • 1 teaspoon baking soda
  • 2 eggs
  • 1 1/2 cups oil
  • 1 cup buttermilk
  • 1 Tablespoon vinegar
  • 1 teaspoon vanilla
  • 2 oz. red food coloring

  1. Preheat oven to 350 degrees.
  2. Grease and flour two 8 inch cake pans.
  3. Lightly stir eggs in a medium bowl with a wire whisk. Add remaining liquid ingredients and stir together with whisk until blended. Set aside.
  4. Place all the dry ingredients in your mixing bowl and stir together really good with another wire whisk.
  5. Add wet ingredients to the dry ingredients and mix on medium-high for about a minute or until completely combined.
  6. Pour into cake pans and then drop the pans on the counter a few times to release any air bubbles.
  7. Bake for about 30 minutes or until a toothpick inserted comes out clean.
  8. After about ten minutes, remove from pans and cool completely on a wire rack. I also cover in plastic wrap while the cakes cool.
  9. Then make the frosting.
Cream Cheese Frosting

  • 8 oz. cream cheese, room temperature
  • 1 cup butter, room temperature
  • 1 teaspoon vanilla
  • 6 cups confectioners’ sugar

  1. Sift sugar and set aside.
  2. Beat cream cheese and butter on high until creamy. Add vanilla.
  3. Then, add the sugar in batches. Scrape down the sides in between each addition.
  4. And frost away.


A nice, bold red dome :-)

Red, but not velvety, hands (be careful when handling food coloring!)

As an ode to old-school Merced bakeshop birthday cakes, I made old-fashioned florets and roses in classic red. My friend, Mai, and myself love to reminisce those huge white birthday cakes from Merced. The kind that your mom bought you for every birthday you celebrate. The kind with royal-icing florets :-) Don't you just love to scoop Merced icing into a plate and eat that with a huge glass of Coke? Heaven!

Roses and florets

Red gooey-ness

One thing to note about cream cheese frosting is that it melts a lot quicker than ordinary buttercream. Make sure you put this in the ref when you're not ready to serve yet. In my case, I transported the cake to my aunt's house for merienda. Took me 5 minutes to get there. With the Philippine humidity and weather on Holy Week, my flowers wilted in as little as 3 minutes after placing the cake in the buffet table.

Pawis rating: 2 of 5 very easy!

Thursday, April 14, 2011

So Little Time!

I want to cook so many things but I've got so little time! Work is such a waste of time LOL!

How can I concentrate with all these things in the food blog world?

First, mini-heaven in a word - cupcake. All the chocolate cupcakes and all the fruit flavored ones. So many cupcakes to choose from.

Chocolate chip cupcakes with Chocolate Cream Cheese Frosting from My Baking Addiction.
Chocolate and cream cheese = another match made in heaven

Chocolate Chip Cookie Dough cupcakes from Tidymom
Cool idea to put cookie dough inside the cupcake!

Orange cupcakes with Cream Cheese Frosting from My Baking Addiction
Wow! I don't think we have something like this here...it's about time we have one :-)

Then there's the cross between chocolate and fruit-flavored cupcakes: Chocolate Covered Strawberry Cupcakes from My Baking Addiction
Simple, but very elegant - and delicious I bet! Vanilla cupcakes with cream cheese frosting from A Farm Girl's Dabbles.
Sugar and spice! Snicker Doodle cupcakes from A Farm Girl's Dabbles

Second, cookies, cookies, cookies!

Can you believe it??? Low-fat Weight Watchers Chocolate Cookies from Tidymom

Coffee and cookies? Why not! Cappuccino cookies with espresso and white chocolate by Joy the Baker

Another fruit and chocolate combo - Brown Butter Toasted Coconut Chocolate Chip cookies by Joy the Baker

And last, how can you have dessert without the main course? Duh!

Vegetable lasagna by Pioneer Woman

Honey barbecue meatloaf by Can You Stay for Dinner

I'm getting hungry. And I have lots to do. I should get back to work, like, now.

Wednesday, April 13, 2011

Goin' Bananas! Banana Chocolate Chip Cake and Banana Buster Brown Cupcakes

Once my friends and I talked about what food you would want to be left with if it was the only thing you would eat for the rest of your life. My friends immediately answered kare-kare (a peanut-based beef stew) or lechon or whatever fancy meal you'd usually find in a buffet.

I simply answered, banana. Yes, the humble banana. I thought about foods I absolutely love like chocolates or cheesecake or rice or yes, lechon (hihi!). But then I thought if it was the only thing I would eat for the rest of my life, I'd probably puke by the third time.

But bananas are different. I could a banana every single meal. I could eat it as my breakfast. Sometimes as lunch. Or dinner. Or when I wake up in the middle of the night hungry (don't ask).

I love bananas so much that I'm unusually giddy when I see big, bright yellow bananas lining up supermarket fruit aisles or street vendor stands. I even have my favorite banana vendor stand close to our house. I'm so weird at bananas that my sister once thought of gifting me with a banana case (like a lunch box but made specifically for one piece of banana). I know, weird.

Today was one of those lovely days when my aunt visited us with a huge bag of bananas - the big, bright yellow ones :-)

First up, the no-fail, always in-demand banana chocolate chip cake. My daughter absolutely loves this cake. I don't bake it like a usual cake in a cake pan but rather on mini-loaves because they're more like sweet, smooth bread for me.

I made these before and the recipe is here.

Sweet banana and chocolate chip goodness!

I love how the chocolate chips melt slightly when the cake is done.

I like mine brown and a little burnt.

Closer...ooops! That's too close!

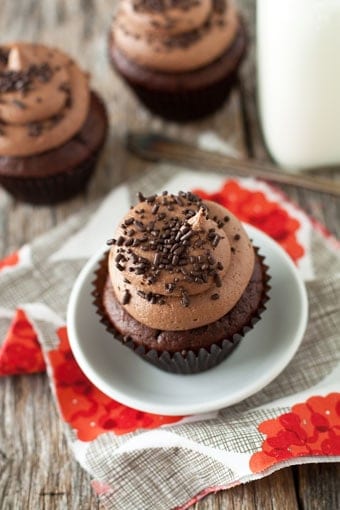
After making the banana chocolate chip cake and placing the dough in the mini-loaf pan, I made this heavenly cupcakes from Tidymom. I placed both pans in the oven at the same time (save energy, people!)

Banana Buster Brown Cupcakes from Tidymom.net
  • 1 cup (200 grams) granulated white sugar
  • 1 scant cup (123 grams) all-purpose flour
  • 3/8 cup (38 grams) unsweetened cocoa powder (regular or Dutch-processed)
  • 3/4 teaspoon baking powder
  • 3/4 teaspoon baking soda
  • 1/4 teaspoon salt
  • 1 large egg
  • 1/2 cup mashed ripe bananas (about 1 medium sized banana)
  • 1/2 cup (240 ml) warm water
  • 1/4 cup (120 ml) milk
  • 1/4 cup (60 ml) canola or corn oil
  • 3/4 teaspoon pure vanilla extract

  1. Preheat oven to 350° and line muffin pan with 12 cupcake liners
  2. Using a large bowl, whisk together dry ingredients: sugar, flour, cocoa powder, baking powder, baking soda and salt. Set aside
  3. In another large bowl, whisk remaining ingredients until combined: egg, banana, water, milk, oil, vanilla.
  4. Combine wet and dry ingredients and stir until combined.
  5. Scoop batter into cupcake liners 3/4 full.
  6. Bake for 20 minuets or until toothpick inserted comes out clean.
  7. Remove from oven. Cool completely before frosting.
Tidymom has a frosting combo for this cupcake called Peanut Butter Brown Sugar Buttercream (isn't this just tempting?). But I did not make this because I still have leftover coffee buttercream from 2 days ago (hello, reduce-reuse-recycle!). And I think it would be a good combination for this cupcake. Well, what do you know? It is!

Look at how moist these cupcakes are!

I bet these will make a great cake too! What about cake pops? :-)
With florets
With small roses
Another one please!

Pawis rating: 2 of 5 very easy!

Tuesday, April 12, 2011

Onion Focaccia Bread

I'd love to have an iPhone. Not that I don't like my Blackberry anymore...ok, I hate it. I hate that it has very limited available applications. I hate that the screen is so small. I hate that I can't do much with it without an internet plan (and do you know how freakin' expensive internet plans are in this country???) Yup, I would love to have an iPhone right about now.

Why am I saying this? You know those fun applications in iPhone or iPod? Are you familiar with Whole Foods recipes? :-) That's where I got this latest recipe.

This recipe is for Onion Focaccia. But since I don't like onions and I'm the boss here (hehehe), I decided to skip that and just use parmesan cheese and dried rosemary.

This bread is a huge failure. I was very frustrated and felt that I'm really not meant to be a bread-maker (is there such a word?).

Apparently, I used the wrong yeast. The recipe called for active dry yeast but stupid me, used instant dry yeast. Stupid me again, googled AFTER cooking the bread and realized this huge mistake. A wiser me should google BEFORE starting to cook if anything in the recipe seems unfamiliar territory.

This is sad. I could tolerate bland food but not inedible food or should I say, thing? Aargh!

The only redeeming factor here is the kneading and the punching. I didn't know it was such a relaxing activity! I will do this again just to knead and punch dough.

  • 1 tsp honey or maple syrup
  • 1 (1/4 ounce) package active dry yeast
  • 3 1/2 cups all-purpose flour
  • 2 1/2 tsp salt, divided
  • 1/4 cup plus 1 tbsp extra virgin olive oil
  • 3 pounds sweet yellow onions, cut into eights, then thickly sliced

  1. In a large bowl, mix 1/2 cup warm (105 to 115F) water with honey or maple syrup. Sprinkle with yeast and set aside to let stand for 5 minutes, or until foamy.
  2. Stir in flour, 1 1/2 tsp of salt, olive oil, and 1 cup warm water, then transfer dough to a lightly floured surface.
  3. Knead until smooth and elastic, then transfer dough to a lightly oiled large bowl, turning the dough to coat. Cover and let stand in a warm draft-free spot until doubled in bulk, about 1 hour.
  4. Meanwhile, heat remaining 1 tbs oil over medium heat in a large skillet. Add onions and remaining 1 tsp salt and reduce heat to low. Cook, stirring frequently, for 1 hour or until onions are very soft and golden brown. Set aside to let cool.
  5. Punch down dough, then transfer to a lightly oiled jelly roll pan or large baking sheet and pat dough out into a 15-inch X 11-inch rectangle. Cover and let stand 45 minutes or until puffed and well risen.
  6. Spread onions over dough, then cover and let rise again for 30 minutes.
  7. Preheat oven to 425F. Uncover dough and bake on the lowest oven rack for 25 minutes, or until crust is golden brown and crisp. Cut into pieces and serve.

I took the dough a few minutes before it is cooked and sprinkled parmesan cheese and rosemary all over. Returned this to the oven to cook through.

Does this look like a bread? It's more like cement, cement bread.

So not decent...very frustrating

Pawis rating: 5 or 5 this whole "letting the dough rise" is very depressing.

Carrot Cake with Cream Cheese Frosting

I didn't know I could actually make a carrot cake. I didn't know I would even try making one. Why?

The first and only time I've tried carrot cake was when someone brought one in the office. I remember it to be too bitter. I don't know why. Maybe my taste buds were just used to eating sweet cakes.

Then I realized it wasn't me because we were at least 10 people in the room and no one could finish a slice.

Joyofbaking.com is one of those sites that should always, always be bookmarked for new and expert bakers. They have loads of recipes and how-tos. The videos are very helpful. What I like most is that they have a list of top tested recipes. This one is the third - red velvet cake is first, then vanilla cupcake. I automatically chose this.

How hard can a carrot cake be?

Let me tell you - when you make this cake, it will be a labor of love.

Why? Grating those darn carrots is not easy!!! And you have to make 2 1/2 cups! I don't have those fancy-schmancy graters or food processors to do this for me so I grated every single carrot by hand.

Which also means I had to chop those walnuts by hand. Note to self - get a food processor and save buckets of sweat.

The saving grace from the buckets of sweat would have to be the cream cheese frosting. I could eat a whole box of cream cheese. Imagine putting cream cheese together with butter and sugar. Heaven.

You don't even have to wait for the "light and fluffy" stage as with all other frosting recipes. This one you just have to mix till blended.

Next time I make this I will double the cream cheese frosting for the obvious reason that frosting is something that should be on top of the cake and on the side, like a special salad dressing.

Recipe from Joy of Baking:

Carrot Cake Recipe:

  • 1 cup (100 grams) pecans or walnuts - I used walnuts, never liked pecans anyway.
  • 3/4 pound (340 grams) raw carrots (about 2 1/2 cups finely grated)
  • 2 cups (260 grams) all-purpose flour
  • 1 teaspoon baking soda
  • 1 1/2 teaspoons baking powder
  • 1/2 teaspoon salt
  • 1 1/2 teaspoons ground cinnamon
  • 4 large eggs
  • 1 1/2 cups (300 grams) granulated white sugar
  • 1 cup (240 ml) safflower, vegetable or canola oil (or other flavorless oil) - I used canola oil
  • 2 teaspoons pure vanilla extract

  1. Preheat oven to 350 degrees F (180 degrees C) and place rack in center of oven. Butter or spray two - 9 x 2 inch (23 x 5 cm) cake pans and line the bottoms of the pans with a circle of parchment paper.
  2. Toast the pecans or walnuts for about 8 minutes or until lightly browned and fragrant. Let cool and then chop coarsely. - I didn't do this and I have good reasons. First, I don't know how to toast nuts (I saw a tutorial but I still haven't gone around to actually watch the video). And second, as with all things I place on top of a stove, I'm scared that I'd burn the nuts.
  3. Peel and finely grate the carrots. Set aside.
  4. In a separate bowl whisk together the flour, baking soda, baking powder, salt, and ground cinnamon. Set aside.
  5. In bowl of electric mixer (or with a hand mixer), beat the eggs until frothy (about 1 minute). Gradually add the sugar and beat until the batter is thick and light colored (about 3 - 4 minutes). Add the oil in a steady stream and then beat in the vanilla extract. Add the flour mixture and beat just until incorporated. With a large rubber spatula fold in the grated carrots and chopped nuts. Evenly divide the batter between the two prepared pans and bake 25 to 30 minutes or until a toothpick inserted in the center comes out clean.
  6. Remove from oven and let cool on a wire rack. After about 5 -10 minutes invert the cakes onto the wire rack, remove the pans and parchment paper, and then cool completely before frosting.
  7. To assemble: place one cake layer, top side down, onto your serving plate. Spread with about one third of the frosting. Gently place the other cake, top of cake facing down, onto the frosting, and spread the rest of the frosting over the top and sides of the cake. If desired, press toasted and finely chopped nuts on the sides of the cake and decorate the top of the cake with marzipan carrots (see below). Cover and refrigerate any leftovers.

Serves 10 - 12.

Cream Cheese Frosting:

  • 1/4 cup (57 grams) unsalted butter, room temperature
  • 8 ounces (227 grams) cream cheese, room temperature
  • 2 cups (230 grams) confectioners (powdered or icing) sugar, sifted
  • 1 teaspoon (4 grams) pure vanilla extract
  • 1 teaspoon finely grated lemon zest (outer yellow skin)

  1. In bowl of electric mixer (or with a hand mixer), beat the cream cheese and butter, on low speed, just until blended with no lumps. Gradually add the sifted powdered sugar and beat, on low speed, until fully incorporated and smooth. Beat in the vanilla extract, and lemon zest.

Simple, understated carrot cake
I could not make a smooth layer out of this frosting so I made messy waves instead. Very easy!
Closer :-)

The last slice after my friends in the office devoured the cake. This was saved for our friend who was on training. Poor, lonely carrot cake slice :-(

Pawis rating: 5 of 5 because of those carrots and nuts!

Depressed but coping

After a failed Focaccia bread attempt, I don't want to try anything with the word yeast in the recipe. I made the mistake of using instant dry yeast on a recipe that calls for active dry yeast. Aaaargh!!! Googled AFTER the disaster and yes, I should not be substituting one for the other. Next time, I should google BEFORE trying on a recipe!

After about 10 minutes of depression, realizing that my bread was as hard as rocks 5 minutes after they were taken from the oven and cooled, I looked up recipes again and found this: The Pioneer Woman's Cinnamon Rolls!!!

Do you appreciate the beauty in this? I do.

So, the question now is: Where can I get active active dry yeast?

Thursday, April 7, 2011

Pasta Carbonara

I've been craving for spaghetti with carbonara sauce the past 2 days that I've been lurking in different sites and discussion groups to get a good recipe.

I found a good recipe at Pioneer Woman which is bechamel-based. I want to try this soon but I don't have time to go to the supermarket to buy ingredients.

TOSH's Spaghetti Carbonara in a takeout container (working lunch, sheesh!)

In the meantime, to ward off the craving, I went to The Old Spaghetti House to get their classic Carbonara. Good but I would prefer more sauce = more calories :-)